Scanning and printing
A developed negative is not a photograph yet – it’s a master that has to be interpreted into a positive, either optically (an enlarger and photographic paper) or digitally (a scanner or a camera, then inversion software). This last step has more effect on how your film “looks” than most people realise.
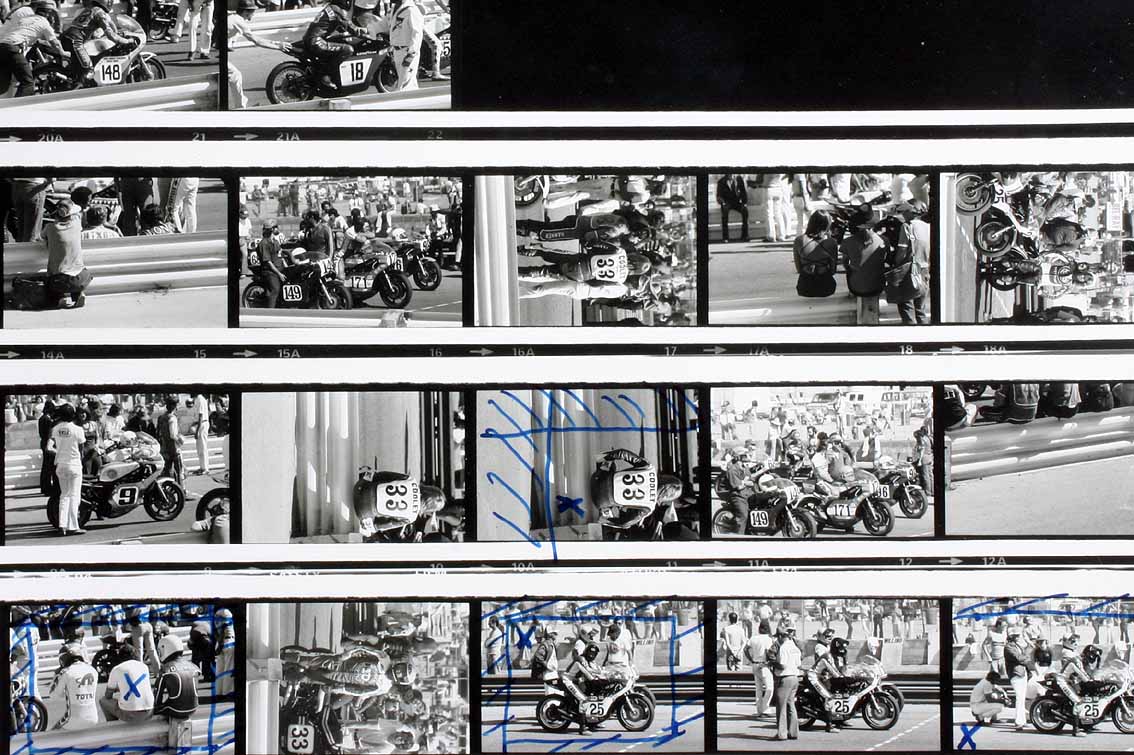
A contact sheet: the whole roll printed at negative size in one pass, the traditional first look at what you shot before choosing frames to enlarge or scan. [Photo: Si Griffiths, CC BY-SA 3.0]
In short
Scanning routes, best-to-cheapest per quality: dedicated film scanner (Plustek, Nikon Coolscan) ≈ camera “scanning” with a macro lens ≈ pro lab scanner (Frontier / Noritsu) > good flatbed (Epson V600/850) > cheap all-in-one.
The inversion (removing the orange mask, mapping density to tone) is where colour is decided. Negative Lab Pro, Grain2Pixel, SilverFast, VueScan, or the lab’s software.
“Frontier look” vs “Noritsu look” are real: different lab minilab scanners render colour and contrast differently from the same negative.
Optical printing (RA-4 colour or silver-gelatin B&W) is the original output and still the most beautiful for many – no pixels, continuous tone, archival.
Scanning: the hardware
Method |
Real resolution |
Notes |
|---|---|---|
Dedicated 35 mm scanner (Plustek 8100/8200, Reflecta, ex-Nikon Coolscan V/5000) |
~3200–4000 true dpi |
Best sharpness and Dmax for 35 mm at home. Slow (2–4 min/frame). Coolscans are discontinued and expensive secondhand but still the gold standard. |
Camera “scanning” (digital camera + macro lens + light source + film holder) |
limited by your sensor (24–60 MP) and lens |
Fast (seconds/frame), excellent quality, flexible. Needs a good macro (or enlarger lens on bellows), a high-CRI light (Kaiser, Negative Supply, Skier), a flat film holder, and alignment. The enthusiast default now. |
Flatbed (Epson V600, V850, Canon 9000F) |
V600 ~1600 true dpi; V850 ~2300 with wet mount |
Convenient, does 120 and sheet too, mediocre for 35 mm (soft, limited Dmax). Fine for contact-sheet-level review and web use; disappointing for big prints from 35 mm. |
Lab scan (Fuji Frontier SP-3000, Noritsu HS-1800 / LS-600) |
~2000–4000 dpi depending on setting |
What most people get with “dev + scan”. Fast, good colour science baked in, but the operator’s settings and the machine’s look are applied for you – great for consistency, less for control. Ask for “flat/raw” scans if you want to convert yourself. |
Drum scan |
8000+ dpi, maximum Dmax |
Overkill for 35 mm unless exhibition-printing huge; rare and pricey. |
Key idea
For 35 mm, the light source and film flatness matter as much as the scanner’s rated resolution. A curled negative or a low-CRI LED will ruin a 4000 dpi scan; a flat neg on a good light with a 24 MP camera and a sharp macro will beat a mediocre flatbed easily.
Inversion: where colour is decided
A colour negative scan starts as an orange-tinted negative image. Turning it into a correct positive means:
Subtract the orange mask – the base colour varies by film stock (Kodak vs Fuji vs CineStill-without-remjet), so the software needs to sample clear film (rebate) or know the stock.
Invert density to tone.
Set black and white points and distribute the midtones – this is a creative choice, not a fixed operation.
Balance colour – neutralise casts, decide warmth, match skin.
Tools:
Negative Lab Pro (Lightroom plugin) |
The enthusiast standard for camera scans. Good film-like colour models, per-stock profiles, batch-friendly. Paid. |
|---|---|
Grain2Pixel / FilmLab / SmartConvert |
Free/cheaper alternatives; Grain2Pixel (Photoshop) is well regarded. |
SilverFast / VueScan |
Drive the scanner and invert (NegaFix / VueScan’s negative profiles). VueScan is cheap and supports almost every scanner ever made, including dead Nikons. |
Manual (Photoshop curves / ColorPerfect) |
Maximum control, steep learning curve. |
Lab software (Frontier/Noritsu built-in) |
Automatic, consistent, applied by the operator. You can request flat scans to skip it. |
Slide film is easy by comparison – it’s already positive, no mask; scanning is just capturing it accurately (watch the high Dmax – cheap scanners crush slide shadows).
The lab-scanner “look”
The same negative scanned on a Fuji Frontier vs a Noritsu vs a home setup can look like three different films:
Frontier (SP-3000): often described as cleaner, cooler-neutral, smooth, slightly lifted blacks, pleasing skin. The “Instagram film look” a lot of people chase.
Noritsu (HS-1800 / LS-600): a touch warmer and contrastier, more “punch”, arguably more detail/sharpness, grain more visible.
Home camera scan + NLP: whatever you dial in – the most neutral starting point.
None is “correct” – the negative holds the information, the scan is an interpretation. If you love a particular lab’s scans, that’s a real reason to keep using that lab.
Optical printing (the darkroom)
The original positive-making process, and still unmatched for tonality and permanence.
Black-and-white (silver gelatin)
Enlarger projects the negative onto photographic paper (RC for speed/learning, fibre-base for exhibition).
Variable-contrast paper + magenta/yellow filtration (or a VC head) sets contrast – this is where you use the “develop for the highlights” negative.
Test strip → exposure time; dodge (hold back light → lighter) and burn (add light → darker) local areas.
Develop (Dektol/Multigrade dev) → stop → fix → wash → dry. All under a red/amber safelight (paper is blue-sensitive, mostly).
A well-made silver print has a tonal subtlety and a surface quality that scans and inkjet struggle to match, and properly processed fibre prints last centuries.
Colour (RA-4)
Same idea, colour paper, RA-4 chemistry (developer → blix → wash, ~35 °C), and it must be done in total darkness (colour paper is panchromatic) or with very dim specific-filter safelights. Colour balance is set with the enlarger’s CMY filters via test prints. Harder than B&W, less common at home, but RA-4 kits and print-processing drums exist and the results from a colour negative are gorgeous.
Fun fact
“Scanning” film with a digital camera is really rephotographing it – and it’s arguably closer to how a darkroom enlarger works (projecting light through the negative) than a traditional scanner’s sensor-on-a-track is. A camera, a macro lens and a good backlight now out-resolve every consumer film scanner ever sold, which is why the dedicated-scanner market barely exists anymore.
Where to go next
How colour film works – the orange mask the inversion removes.
Grain, granularity and sharpness – how scanning and sharpening interact with grain.
C-41: colour negative processing – the minilab scanners came bundled with the minilab processors.